Re: 100% homegrown

Wed May 30, 2012 2:20 am

Hops grow so fast, you almost can just sit there and watch them grow. My cascades are about 15 feet high right now. You've inspired me to go fertilize them. Thanks.
User avatar
mtyquinn
 
Posts: 139
Joined: Tue Aug 25, 2009 8:58 am

Re: 100% homegrown

Wed May 30, 2012 5:02 am

drummstikk wrote:Of course, you'll probably want to spend a buttload of time just sitting, drinking a beer, and staring at the plants as they grow. That's where most of my time went.


That sounds like a fine way to spend an afternoon. Any word on whether you'll be collaborating with your local brewery? Or just making your own beer?

drummstikk wrote:...and all the pictures in the world of Asians in hats couldn't change that.


I used to have one of those hats... went as an Chinese pirate for Halloween once. Some day I'll get a suit of armor and another one of those hats and wear them for Halloween. When people asked if I am "a chink in the armor", I'll get offended and demand beer as reparation. :aaron
Spiderwrangler
PFC, Arachnid Deployment Division

In the cellar:
In the fermentor: Belgian Cider
In the works: Wooden Cider
User avatar
spiderwrangler
Global Moderator
 
Posts: 4659
Joined: Thu Jun 03, 2010 2:09 pm
Location: Ohio

Re: 100% homegrown

Wed May 30, 2012 9:34 am

drummstikk wrote:If you ever want to get into the growing side, a suburban backyard is probably enough space to grow one 5-gal batch every Fall, with room leftover for the kids to play. People will tell you to start with growing just the hops because they're "easier", but I think the issue is that there's just less information out there about growing grains. Hopefully this thread can serve as a start for anybody interested in the starch side of the equation.


I have the suburban backyard, but it's at 6300 feet above sea level, and we have a hard time getting much of anything to grow considering we usually have snow in the yard until May. But I could give it a try. Clearing a 10x10 plot would be a piece of cake.

drummstikk wrote:Of course, you'll probably want to spend a buttload of time just sitting, drinking a beer, and staring at the plants as they grow. That's where most of my time went.


Considering I go down in my basement just to stare at my beer as it ferments, you're probably right.

I may give malting a try before growing. I have some raw wheat that I could use as-is in some recipes, or I could try malting it and have a few more options.
In any case, nice work. I imagine you'll have a long line of people wanting to try the finished beer.
skibikejunkie
 
Posts: 49
Joined: Tue May 08, 2012 5:22 pm

Re: 100% homegrown

Wed May 30, 2012 7:07 pm

spiderwrangler wrote:Any word on whether you'll be collaborating with your local brewery? Or just making your own beer?

I will definitely make at least one 5-gal batch of 100% homegrown! But everything that's left over will become a caramel malt for an Almanac seasonal in the fall. It'll be a wet-hop 100% California-grown beer, and you'll be able to get it on tap in the Bay Area. Too bad they can't bottle it, but I'll need a bigger field to make it into their regular lineup!
skibikejunkie wrote:I have the suburban backyard, but it's at 6300 feet above sea level, and we have a hard time getting much of anything to grow considering we usually have snow in the yard until May. But I could give it a try. Clearing a 10x10 plot would be a piece of cake....
I may give malting a try before growing. I have some raw wheat that I could use as-is in some recipes, or I could try malting it and have a few more options.
When does the ground thaw, and when is the last frost? Make sure you have about 2200 Growing Degree Days between the last frost in Spring and the first frost in Fall. weather.com has a calculator where you just plug in your zipcode and two dates, and it will tell you the typical GDD between those two dates.

Practicing malting on some wheat kernels from the health food store is DEFINITELY the way to go. It's just like learning to brew -- you'll make some mistakes your first few times, but you'll probably get malt anyway. By the time your crop is finished, you will have malted like 4-5 times and be an expert! Go get planting! Johnny's has the Conlon seeds I used, and they worked great.

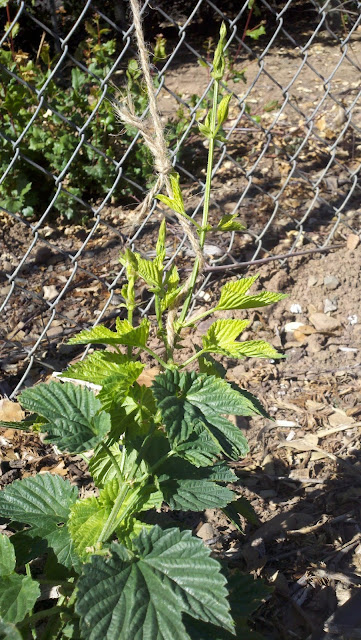
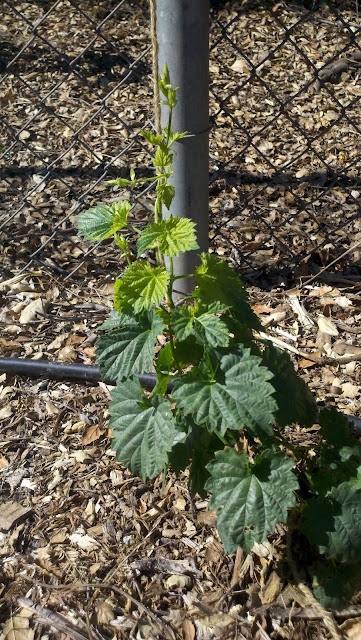
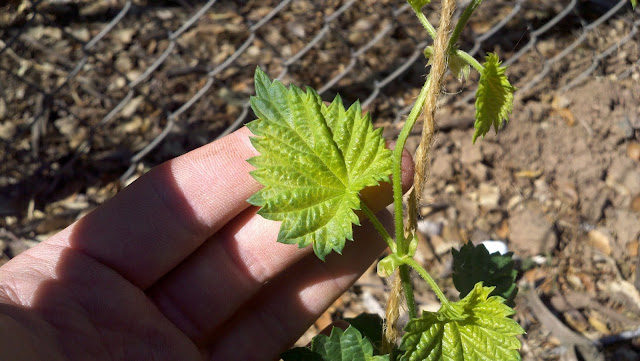
Ok, so about fertilizing -- I've now fertilized twice with 2.5 g per plant of 15-5-15, 8 days apart. But I got a really weird result! The new growth is a pale lime green:

Image

Image

Image

Is this a problem? Anybody else run into this? I don't know what to do besides give the fertilizer a rest for a week or two and see if it clears up. Any ideas?
User avatar
drummstikk
 
Posts: 68
Joined: Thu Feb 18, 2010 2:32 pm

Re: 100% homegrown

Thu May 31, 2012 8:59 am

drummstikk wrote:Make sure you have about 2200 Growing Degree Days between the last frost in Spring and the first frost in Fall...

Practicing malting on some wheat kernels from the health food store is DEFINITELY the way to go. It's just like learning to brew -- you'll make some mistakes your first few times, but you'll probably get malt anyway. By the time your crop is finished, you will have malted like 4-5 times and be an expert! Go get planting! Johnny's has the Conlon seeds I used, and they worked great.


We will definitely have 2200 GDD before we get frost in the fall. Seeds are cheap, so I just ordered some and will plant a small plot just for grins. I'll practice malting on some wheat between now and then. Do you have any links to a how-to on malting?
skibikejunkie
 
Posts: 49
Joined: Tue May 08, 2012 5:22 pm

Re: 100% homegrown

Fri Jun 01, 2012 9:43 am

skibikejunkie wrote:We will definitely have 2200 GDD before we get frost in the fall. Seeds are cheap, so I just ordered some and will plant a small plot just for grins.


The property management company where my office is located just turned some bare land into a community garden. Just received confirmation that my request for one of the plots was approved, so I've got another 5x50 space to plant barley, and it's also down in the valley, so growing conditions will be a bit better. :jnj
skibikejunkie
 
Posts: 49
Joined: Tue May 08, 2012 5:22 pm

Re: 100% homegrown

Fri Jun 01, 2012 7:29 pm

skibikejunkie wrote:
skibikejunkie wrote:We will definitely have 2200 GDD before we get frost in the fall. Seeds are cheap, so I just ordered some and will plant a small plot just for grins.


The property management company where my office is located just turned some bare land into a community garden. Just received confirmation that my request for one of the plots was approved, so I've got another 5x50 space to plant barley, and it's also down in the valley, so growing conditions will be a bit better. :jnj


Great! You should be able to get enough for a 5-gal batch from the 5x50 plot!

Malting: the best source of information is http://brewingbeerthehardway.wordpress.com/. Jean-Francois Dyment has complied a list of malting links, and he records his own techniques.

His blog is where I go to learn more, but I do things a little simpler than Jean-Francois, and it works. Here's what I do:

Decide how much you want to malt. Start with about 5 pounds and move up from there. Put the grains in a 5-gal plastic bucket, and wash 3 times with water. Throw away grains that float at the water's surface (these are unfilled grains that should have been winnowed away.)

Then transfer grains to a bag (such as you'd use for BIAB) and soak in water that you would brew with, for 8 hours. Pull the grains out of the water to drain and to let them breathe for 6 hours. You can suspend then in a strainer, or you can tie the bag to something sturdy. Then soak the grains again for 8 more hours.

After the 8 + 6 rest + 8 hours soaking, the grains will have enough water to germinate. (It's about 45% moisture by weight you're shooting for, but unnecessary to measure it for now.) Drain grains for about one hour, using the same technique you did earlier (strainer or tie bag to sturdy object). This allows the grains to absorb all the water on their surface. Very important! Water on the surface of grains can later lead to fungus, so give those grains an hour to absorb the surface water.

Next take a big flat cardboard box, like the ones that laptop computers come in, and line it with a large plastic garbage bag. Dump the grains out of the straining bag, and into the lined box. Here they will germinate for the next 7-11 days. Every day, wash your hands, and then turn the grains. This will 1) release CO2, 2) mix the grains. You'll notice that grains at the bottom of the lined box tend to grow faster. This is because they have better access to oxygen, and they don't dry out. You'll also notice that the grains at the top of the pile slowly dry out. Mix it all up!

When you turn, spritz the grains with good brewing water from a spritzer bottle every time you turn them. How much to add every day? You want to add more water if your environment is dry, and less so if it's wet. Here in northern CA, we typically have humidity between 40-60%, and I add about a cup of water to my 15 lb. pile every day. You're going to have to play it by ear. When you visit your grains in the morning, before turning, look at them. They should not have any surface water, not even the ones at the bottom of the pile But when you crush one grain between your fingers, it should be as soft as a stick of unchewed chewing gum, not hard and not mushy. If it's mushy, or if there is water on the surface of the grains at the bottom of the pile, they're too wet. If the grain is harder than a stick of gum, or if the rootlets are brown and brittle, they're too dry.

Note: the rootlets of the grains at the top of the pile typically dry out a little and get a little brown over the course of 24 hours, even if you're adding the right amount of water. That's normal, and once you mix it up, those rootlets will rehydrate. But if rootlets on the inside of the pile are brown and brittle, they're too dry. You will figure this out with experience.

Don't cover the grains, even if they're too dry. Moisture will condense on the grains when you cover them, and they'll grow fungus. Don't worry too much about the temperature of the grains. Ideally, they should be kept cool at 16-18C, but it's kind of tough to accomplish, and doesn't add much. Probably the only malt to make that requires strictly cool germination temps is Pilsner malt.

Now, once the acrospire reaches all the way to the other end of the grain, they are modified. Ignore the length of the rootlets -- they don't matter. The acrospire is hidden, but you can see its profile through the husk on one side of the grain. You can also take the husk off carefully to see the acrospire, but this almost never works for me. Just look for the acrospire's profile through the husk, and wait for it to go the full length. It's okay too if it pokes out a little bit, but then it's definitely done.

What to do after modification in another post!


Now,
User avatar
drummstikk
 
Posts: 68
Joined: Thu Feb 18, 2010 2:32 pm

Re: 100% homegrown

Sun Jun 03, 2012 11:17 pm

Once the grains are modified, you'll need to decide what type of malt you're making.

If you want to make a pilsner or pale malt, first dry the grains as completely as possible. Commercial maltsters heat the grains to about 40C while drying, but this is hard to accomplish at home, and not necessary. Just dry the grains by either 1) spreading them out into a thin layer on a tarp and blowing them with a box fan, or 2) buying some AC filters, stacking them on top of a horizontal box fan, and spreading the grains in thin layers between the filters. This will get the grains so they are dry and slightly crispy. Next put the grains in pans in your oven, and turn it on as low as it will go. Leave the door cracked, and allow the grains to dry further overnight. In the morning, check the temp. If it's lower than 90C for pilsner, 100C for pale, go ahead and raise the temp in your oven. Allow the dry grains to kiln at this higher temp for 6 hours. (It may be that your oven doesn't go low enough (90C) to make pilsner malt.) You may also want to cover your grains with aluminum foil to protect them from the radiant heat coming directly off of your oven's heating element.

Toasted malts are made by heating this malt at higher temps for longer. You'll have to experiment with your oven to get what you want. Roasted malts produce a lot of smoke -- you can make an impromptu outdoor stove out of your boil kettle, your burner, and a wire rack.

If you want to make caramel malt, then when the grains are finished modifying, put them all into your mash tun along with the heating element you use for fermentation temperature control in the winter. Close up the tun, and allow the temperature to rise to 50C, protein rest temperature. Depending on the power of your heater, it will probably take a long time to reach this temp. That's ok! Allow the grains to rest at protein temp for 3 hours or so, then move on to saccharification temp. Shoot for 65C, and if you're having trouble getting up to temperature, wrap your tun in blankets for extra insulation. Of course use your temperature controller to prevent the grains from going over the sacch. temp.

Stew the grains at 65C for about 6 hours. It will take much longer to convert starch in the grain than it does in a normal mash, because there is much less water available for hydrolysis inside the grain (don't add water after germination, though -- the grains can only absorb so much, and the extra water will just end up pooling uselessly at the bottom of the tun.)

After stewing, put the grains in pans, and kiln them in the oven at 275-325F while they're still wet. Again, you may want to cover with aluminum foil to prevent toasting them. Monitor the color and flavor at 30 min intervals, and stop kilning when you get the level of caramelization you're looking for. It shouldn't take longer than a few hours. Dry the grains with your fan setup -- you will probably want to return them to the oven (on low with the door cracked) to complete the drying.

I haven't made Munich malt yet, but the idea is to stew the grains in your mash tun at 50C for a long time, about 16 hours, then instead of increasing the temperature to saccharifaciton, put the grains in the oven on low. Let them dry for a while, but not overnight as you did for pilsner / pale malt, and keep the door shut to slow the drying process. After a few hours of drying, increase the heat to 115C or so and let them dry out at this higher temp, again with the door shut. Kiln for 6 hours or so. I still haven't gotten this one to work properly, so let me know if you try it!

The last step in making any malt is to put your grains in a plastic bucket and stir with a mash paddle to break off the rootlets, also called culms. Winnow off the culms by pouring the malt in front of a box fan outside.

Sure, it's a lot of steps, but each one of them is easy, just like brewing. You'll be surprised at how good the beer is from the malt you make yourself, even the first time you attempt it.
User avatar
drummstikk
 
Posts: 68
Joined: Thu Feb 18, 2010 2:32 pm

PreviousNext

Return to Homegrown

Who is online

Users browsing this forum: No registered users

A BIT ABOUT US

The Brewing Network is a multimedia resource for brewers and beer lovers. Since 2005, we have been the leader in craft beer entertainment and information with live beer radio, podcasts, video, events and more.