Re: Chilling on the Cheap

Sat Sep 21, 2013 12:32 pm

Ozwald wrote:
TheHamNerd wrote:I am building a 50' copper immersion chiller and I was going to connect it to my garden hose until I started to pay attention to the temperature of the water coming out of it. So I picked up a small $20 fountain/pond pump at Home Depot and I am going to be doing this same thing. I will fill up my 5 Gallon bucket with ice water, drop in pump and recirculate the hot side back into the ice water. I think this type of setup will work for me, but it was not so cheap....copper is not cheap these days, but I did save a little $$$ by building it myself rather than buying a 50' pre-made copper immersion chiller. :pop


Until you kink the copper once or twice ... don't ask about my first chiller build :lol:

You may want to think about insulating that bucket or using a beverage cooler (especially if you have one laying around). Not that the bucket won't work, but it'll be much more efficient, especially those last few degrees getting down to pitching temp.


Whats up Oz... LOL I was smart and bought the benders, I haven't built it yet, but I have the hardware to do it the correct way for the chiller. As far as the bucket, I should probably use a cooler, I have a few of those around, and since they are coolers they would be insulated properly.
Fermenter: Honey Wheat Ale high ABV "from scratch" (Primary Fermentation Stage) Brewed 10/20/13
In Bottles: Kit Beer (American Pale Ale Wheat Beer)
TheHamNerd
 
Posts: 41
Joined: Sun Sep 15, 2013 10:38 am
Location: Oklahoma City, OK

Re: Chilling on the Cheap

Sat Sep 21, 2013 12:35 pm

mordantly wrote:i made mine out of two-25 foot coils 3/8 copper. i only rinse the outside off of debris. the inside is still full of water.. if in ten years it corrodes ill make one from stainless tubing.. water lines in residences is copper and last a LONG time!


Yes, good call. If mine ever ends up to where I cannot clean it due to contamination, I too would go the SS route! I live in a 50 plus year old house, and my water pipes are all copper in the walls.
Fermenter: Honey Wheat Ale high ABV "from scratch" (Primary Fermentation Stage) Brewed 10/20/13
In Bottles: Kit Beer (American Pale Ale Wheat Beer)
TheHamNerd
 
Posts: 41
Joined: Sun Sep 15, 2013 10:38 am
Location: Oklahoma City, OK

Re: Chilling on the Cheap

Sat Sep 21, 2013 12:41 pm

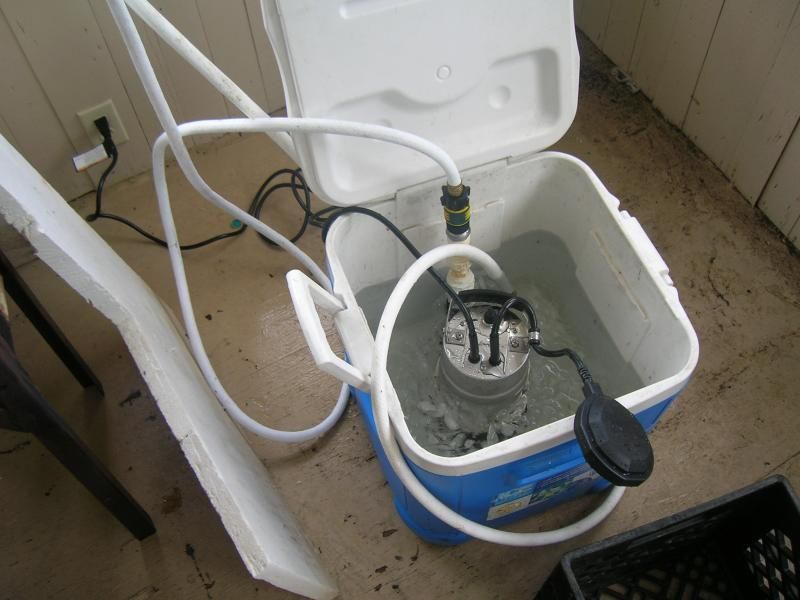
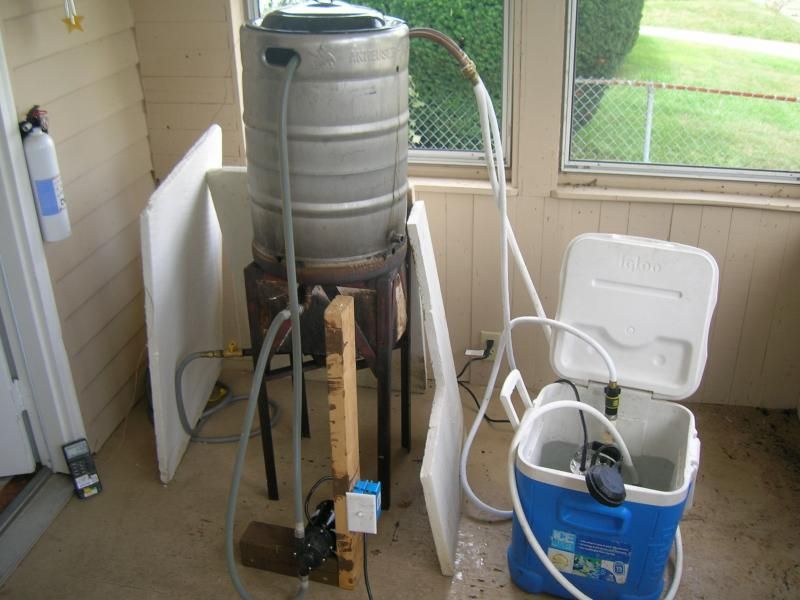
The method of recirculating ice through the chiller rules. It saves a lot of water and it can get to lagering temperatures in short order. I run down to 100° F with running water (10-15 mins), then switch over to recirculated ice water with a submersible pump. Total time for 10 gallons to the mid 50's is 30 minutes. Probably less in the winter. In addition, I recirculate the wort in the boil kettle, which speeds things up considerably.

Image

Image
User avatar
JoeBeer100
 
Posts: 127
Joined: Sun Nov 11, 2012 5:14 pm
Location: Ohio

Re: Chilling on the Cheap

Sun Sep 22, 2013 12:25 am

TheHamNerd wrote:Whats up Oz... LOL I was smart and bought the benders, I haven't built it yet, but I have the hardware to do it the correct way for the chiller. As far as the bucket, I should probably use a cooler, I have a few of those around, and since they are coolers they would be insulated properly.


What kind of bender are you using? The only ones I've ever seen are the spring-style ones & I've never seen one that was 50' long. I've also heard of the 'fill it with sand' method but after that first one I just got better with the patience & wrap it around a corny method.

A cooler is definitely the way to go to save your ice a bit. The other trick would be to use plain cold tap water sans ice for the initial temp drop & add the ice when you get below 100-120 or so when you really need it (as I just noticed Joe mentioned).

TheHamNerd wrote:
mordantly wrote:i made mine out of two-25 foot coils 3/8 copper. i only rinse the outside off of debris. the inside is still full of water.. if in ten years it corrodes ill make one from stainless tubing.. water lines in residences is copper and last a LONG time!


Yes, good call. If mine ever ends up to where I cannot clean it due to contamination, I too would go the SS route! I live in a 50 plus year old house, and my water pipes are all copper in the walls.


I don't see what's to get contaminated. You don't have to worry about the inside, water or not, since it shouldn't be coming in contact with your wort in the first place. As for the outside, I always cleaned mine with Barkeeper's Friend after every brewday. Shiny copper is happy copper :D. Stainless is good for a lot of things but it really sucks as an exchanger, especially compared to copper.

The only worry to have about water on the inside (my house turned 100 this year & all my water lines are copper as well) is if you freeze it. Ask me how I know.

Image

(Yes, that's diluted wort all over the concrete.)
Lee

"Show me on this doll where the internet hurt you."

"Every zoo is a petting zoo if you man the fuck up."

:bnarmy: BN Army // 13th Mountain Division :bnarmy:
User avatar
Ozwald
Global Moderator
 
Posts: 3628
Joined: Sun Sep 20, 2009 4:14 pm
Location: Gallatin Gateway, Montana

Re: Chilling on the Cheap

Sun Sep 22, 2013 3:41 am

Ozwald wrote:...The other trick would be to use plain cold tap water sans ice for the initial temp drop & add the ice when you get below 100-120 or so when you really need it (as I just noticed Joe mentioned).


I think you'd still go through quite a bit of water. I had originally tried a welding torch cooler (like this one: http://www.globalindustrial.com/p/tools/welding/tig-torches-bodies/water-cooler-14) which has a pump and a radiator with a fan. Granted the water volume was only a few gallons, the water in the cooler got really hot within a minute. Unless you have a huge reservoir like a 55 gallon drum, I think you're going to have to cycle water to knock the first 75-100° off. And even if you have 55 gallons, where and how are you going to store it between batches? I welcome ideas because I'm contemplating going with that method.
User avatar
JoeBeer100
 
Posts: 127
Joined: Sun Nov 11, 2012 5:14 pm
Location: Ohio

Re: Chilling on the Cheap

Sun Sep 22, 2013 7:50 am

@ Oz,

Sorry, I meant the spring benders. I bought a set of spring tubing benders. I did not want to try to bend it by hand without those and kink the copper. I am sure it is still possible with the spring benders. :)

On the contamination side, I was talking about the green shit on the outside of the copper that is suppose to be bad for us. I understand that the water on the inside never touches the wort. I have read so many stories about this green stuff that gets on copper. I have seen it on copper roofs, and gutters. I am sure if you take care of your copper, and rinse it off after every use it should be fine and store it dry. Of course a little common sense goes a long way here I am sure. I have also read that Star San is acidic, and is good to clean the copper with if you start to develop a green funk problem. I know that all this has probably been in many discussions over the years.
Fermenter: Honey Wheat Ale high ABV "from scratch" (Primary Fermentation Stage) Brewed 10/20/13
In Bottles: Kit Beer (American Pale Ale Wheat Beer)
TheHamNerd
 
Posts: 41
Joined: Sun Sep 15, 2013 10:38 am
Location: Oklahoma City, OK

Re: Chilling on the Cheap

Sun Sep 22, 2013 10:00 am

TheHamNerd wrote:Sorry, I meant the spring benders. I bought a set of spring tubing benders. I did not want to try to bend it by hand without those and kink the copper. I am sure it is still possible with the spring benders. :)


Perhaps there is a way, I just don't see how you'd get that sucker 25' inside the copper. Unless you were to do it in segments & solder them back together (which I would never even think about doing). If you do keep the pipe as 1 continuous piece & use the springs, post photos. I want them to work for you, I just can't think of how it would be done.

TheHamNerd wrote:On the contamination side, I was talking about the green shit on the outside of the copper that is suppose to be bad for us. I understand that the water on the inside never touches the wort. I have read so many stories about this green stuff that gets on copper. I have seen it on copper roofs, and gutters. I am sure if you take care of your copper, and rinse it off after every use it should be fine and store it dry. Of course a little common sense goes a long way here I am sure. I have also read that Star San is acidic, and is good to clean the copper with if you start to develop a green funk problem. I know that all this has probably been in many discussions over the years.


Easy. Don't let the green shit start to form in the first place. Rinse off your chiller & use BKF on it. It's simple, only takes a second & your chiller is always super shiny. If you go a few months without brewing the copper will darken up but the verdigris (blue-green unhealthy shit) takes a lot longer to form, especially if you store it in a nice dry place. If you're really worried about it, give it a little touch up with BKF before you put in the wort on the next brewday. BKF is a miracle worker when it comes to copper & stainless, but just like PBW, don't get it anywhere near aluminum.

JoeBeer100 wrote:
Ozwald wrote:...The other trick would be to use plain cold tap water sans ice for the initial temp drop & add the ice when you get below 100-120 or so when you really need it (as I just noticed Joe mentioned).


I think you'd still go through quite a bit of water. I had originally tried a welding torch cooler (like this one: http://www.globalindustrial.com/p/tools/welding/tig-torches-bodies/water-cooler-14) which has a pump and a radiator with a fan. Granted the water volume was only a few gallons, the water in the cooler got really hot within a minute. Unless you have a huge reservoir like a 55 gallon drum, I think you're going to have to cycle water to knock the first 75-100° off. And even if you have 55 gallons, where and how are you going to store it between batches? I welcome ideas because I'm contemplating going with that method.


To clarify, (and rereading it now, I realize it didn't come across this way initially), I'm thinking of it like a pre-chiller. When you use the pre-chiller you use the immersion like normal (not saving your waste water), get it down in temp & then use your pre-chiller. Same thing, don't save the waste water as you knock it down to 100-120 & then use the ice bath recirc to finish it off. I was also thinking more along the lines of efficient chilling times, not in terms of water conservation (which you will save a bit of water by doing it quicker but we're not talking a massive water savings). If you recirc the whole time, you'll burn through a ton of ice which will negate the water savings anyhow. Nature of the beast - you're going to waste some water however you look at it. If it's really that big of a concern you could always buy a small freezer, temp controller & some glycol. :)

I save the waste water for other things instead of trying to reuse it for chilling. When I was doing 5 gallon batches I used to run the output hose to my washing machine then after that was full I'd collect the cooler waste water in buckets for cleaning & watering the garden. Now I hook up the output directly to the HLT/MLT & use it for cleaning up. Using Boog's recirc method will save some water, but no matter what you're going to be wasting some, somewhere along the way.
Lee

"Show me on this doll where the internet hurt you."

"Every zoo is a petting zoo if you man the fuck up."

:bnarmy: BN Army // 13th Mountain Division :bnarmy:
User avatar
Ozwald
Global Moderator
 
Posts: 3628
Joined: Sun Sep 20, 2009 4:14 pm
Location: Gallatin Gateway, Montana

Re: Chilling on the Cheap

Mon Sep 23, 2013 9:41 am

Unless I am missing something here, the spring benders work just fine for this; as that is how I built my coil for my in pot HERMS setup, you do the bend then you slide the spring a bit, bend a little more then slide the spring a bit more. I actually had to go over it a couple of times to get the diameter of the coil right.

First I actually went out and bought a very expensive tube bender, but this was very hard to control and get the curvature just right, the spring bender worked tons better.
CRBrewHound
 
Posts: 594
Joined: Tue Jun 29, 2010 7:53 am
Location: Warrenton, Virgina

PreviousNext

Return to Brewing Equipment

Who is online

Users browsing this forum: No registered users

A BIT ABOUT US

The Brewing Network is a multimedia resource for brewers and beer lovers. Since 2005, we have been the leader in craft beer entertainment and information with live beer radio, podcasts, video, events and more.